Friday, February 15, 2013

Basic Blazer...again

Not to be scuppered by my own poor choice of fabric for this pattern when I made it last week, I went back to the stash, chose a slightly stretchy twill type of fabric as well as Bemberg lining and then made the Basic Blazer again.
The outcome this time around was much better. 


Like before, it was really difficult to get a good photo of the jacket. However it fit perfectly and the
Bemberg lining made it easy to slip the blazer on and off.


For our photo shoot our model agreed to sport some funky leather high tops too.


The only change I made to the pattern was to leave an opening in the back of the lining of the jacket to turn inside out as opposed to leaving the bottom open. During construction I basted most of the back seam of the lining and then removed the basting threads to turn inside out.
Also, I didn't stitch around the outside of the welt pocket as indicated. And instead of having 3 buttons for the front, went with 2. In hindsight I should have made bound buttonholes.


His mom and dad loved the outfit: Basic Blazer Jacket, white t-shirt  O+S Sandbox pants, and brown leather high top sneakers.


Basic Blazer from Blank Slate. Size 2
Off to make more little outfits...........................

Tuesday, February 5, 2013

Photo shoot.

Getting kids to co-operate for photos can be most trying. One minute they are hams for the camera and the next, they want to hog the camera.

Here's Adam willingly sporting for the camera his new Sketchbook shirt and Sandbox pants.


His willingness to model is wearing thin but I can see that the pants hems are a little long as are the shirt sleeve cuffs.  Both are size 2 and next time around I'll make the necessary adjustment.


Okay so now he want to hold the camera.

Quickly I slipped on him the Basic Blazer pattern from Blank Slate; Melly Sews........


...but he was not going to co-operate by standing up for the photo.  He wanted to hold the camera, no ifs, ands or buts!


The blazer was easy and quick to make. Foolishly, I used a faux suede that doesn't have much body even with plenty of stabilizer.  It was impossible to iron and doesn't hold the front lapels properly.

Now our model is winding up to full tantrum because I'm not letting him have my camera.  But just look at those back pockets ... too cute, huh?


Here we are in full melt down.  I like the faux suede fabric because it doesn't crease so next time I'll use it for a dress, maybe the School Photo Dress.


Here I am offering my auxiliary camera .... it's a Canon ..... but no, he wants my Nikon.


I'm going to make this blazer again using a more structured fabric. Oh and with bemberg lining too.

Monday, January 28, 2013

I {heart} fabric

The theme for this week for Project Run & Play is Valentines Inspired Looks.

A few years ago I bought some pretty fabric called 'Blush' by Basic Grey for Moda with the intention to make a Feliz dress. I also made sure I had plenty of contrasting fabric to match for all the ruffles.

Well, that project didn't happen.

But when I read that one of this season's themes could use something with hearts on it, well, all of a sudden the fabric has a new use!

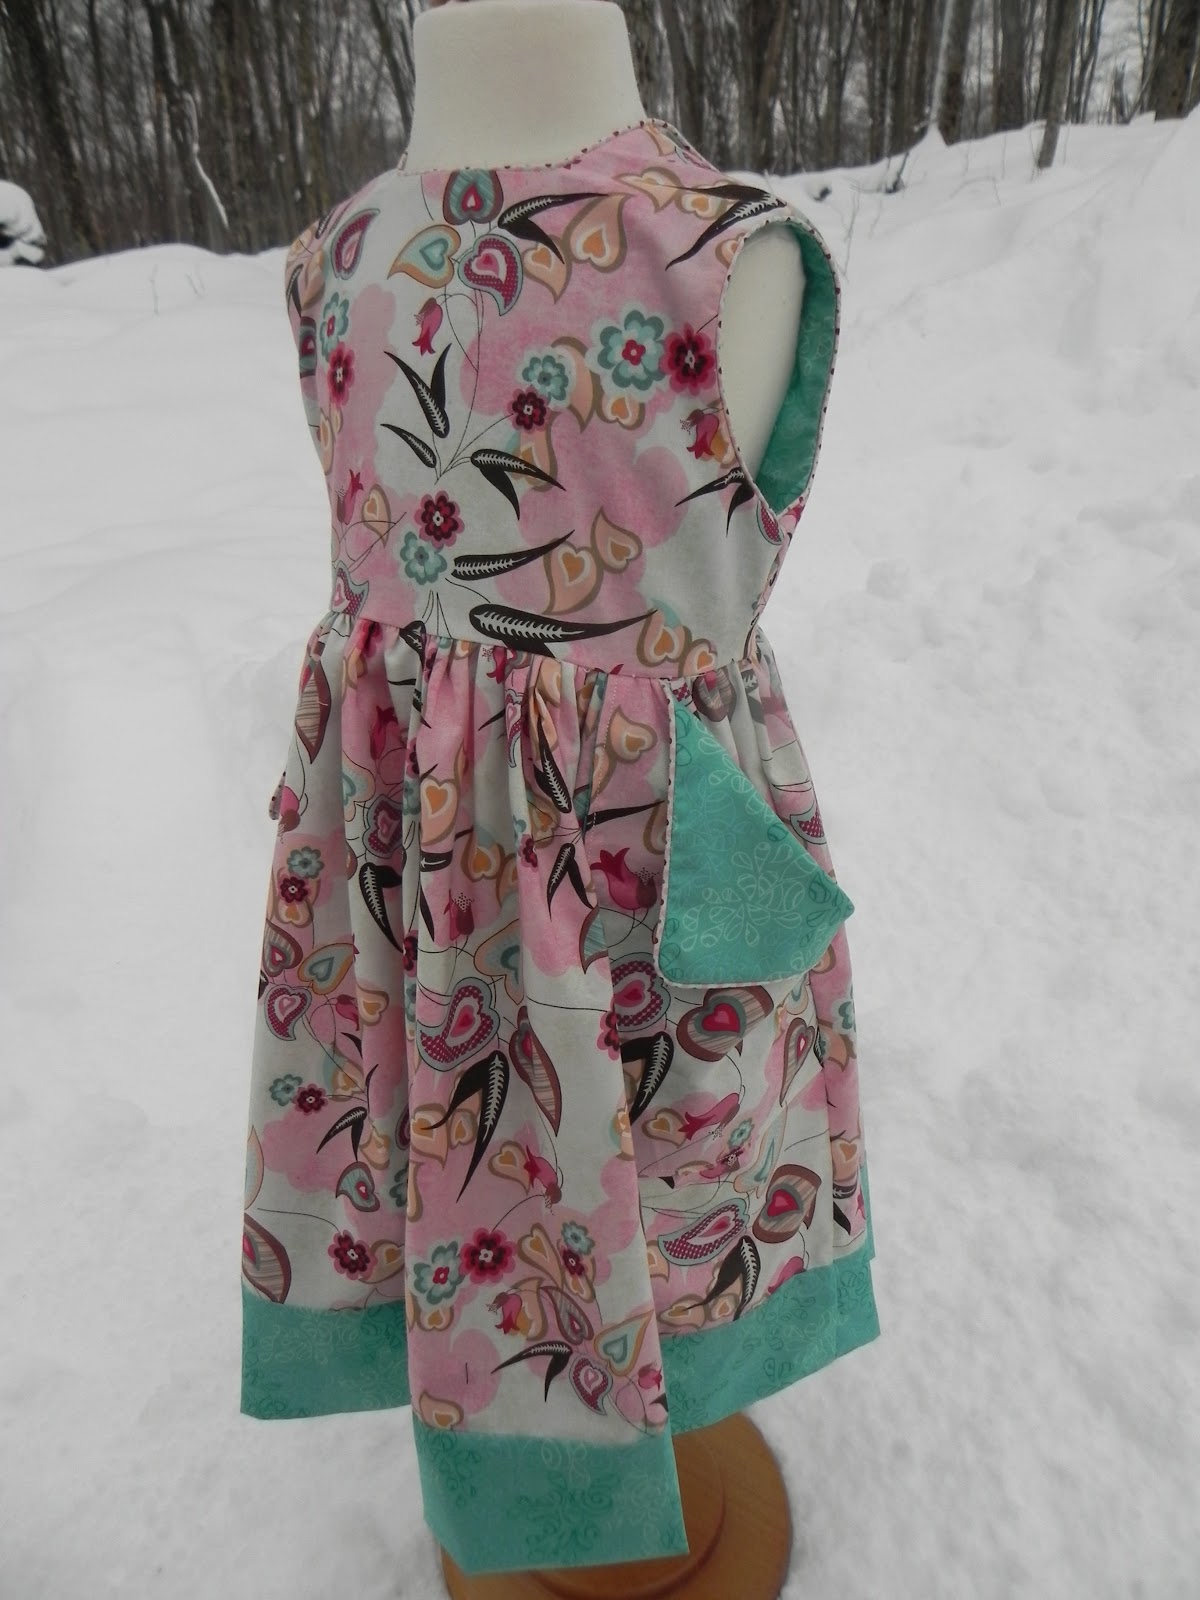
The pattern is Natalie by Childrens Corner.  Size 4.  Despite it being so snowy outside, this dress will be perfect for the summer.


I've made this pattern before and I just love how the back bodice folds back revealing a contrasting fabric.
Since I didn't have enough fabric for the main portion of the dress, I used the same contrasting fabric for the hem.


And I love the pockets too.  Big, deep pockets that a little girl could stash a whole lot of things in them.


I used another complementary fabric for the pocket flap lining.
Hmm, just noticed a few loose threads around the waist.


This pattern uses up a lot of stash fabric which is probably why I like it so much.

And yes there are deer in the background watching me take photos of this dress.


The pattern assumes the user has a fair bit of sewing experience. It's fairly straightforward but the illustrations are somewhat lacking. Overall, the pattern is fairly easy though.

Saturday, January 26, 2013

Shirt and Pants

For my entry to Project Run & Play sew-along on Flickr for this weeks theme 'Boys Week', I made the Oliver + S Sketchbook shirt and Sandbox pants.


Something went wrong with the collar, though.  There wasn't enough room for a buttonhole plus the fabric was too thick even if there was room. Fabric is a pique.  I'm not sure what I goofed up on but something is amiss.
I will make another shirt using thinner fabric and maybe discover where I went wrong with this shirt.


On the pants, I used flat felled seams throughout.  I used a twin needle for the top stitching which I managed to goof up on the corners of the pockets.
I had already goofed up on the shirt so why not continue with the pants!


The topstitching on the back pockets also went a little off kilter too. Hey, at least I'm consistent!
The pants fabric is a stretch twill and it didn't iron well in terms of holding a good crease. Maybe thats the problem....the fabric....not the seamstress.


Both shirt and pants are size 2.  The pants fit Adam perfectly and while I haven't tried on the shirt, I'm sure it will fit just fine.


When I was changing feet during this project, I notice that the coating on the bottom of my 1/4" foot was wearing off and it's only 4 years old.


At any rate, I found the time during this busy past week to sew a shirt and pants.  Our little cottage is presently full of guests so my planned entry for next weeks theme for PR&P 'Love is in the Air' may not get done.

Wednesday, January 23, 2013

New Pattern

Looky, looky!

My friend Judith Marquis has come out with a new pattern for infants called 'Infant Tuxedo Jacket'.


It goes along with her other infant pattern called 'Infant Wardrobe'

I've made the pants and jacket from this pattern and not only is it easy to make but Judith includes a whole lot of design ideas to consider before and during construction. Plus that, she also has a lot of construction tips, tricks and how to's in all of her patterns.

To see the rest of her patterns go here. And while you're there, sign up for her newsletter.
To get to her blog that's full of tutorials go here.

Wednesday, January 16, 2013

Perfect timing!

I was thinking of an interesting way to present a Valentines craft, "glueing" as Caitlin calls it, other than plunking a painted fruit basket full of crayons, stickers and glue sticks in front of her.

Then last night I read through my one of my 'go-to' blogs: Oliver + S and low and behold there was exactly what I was looking for, a free pattern for a Valentine ornament.

In the past I've made little heart-shaped necklace type purses. In the ancient past I think they were called reticules and they were meant to hold small personal items for a lady. Anyway, I had completely forgotten about them until the free pattern post jogged my memory. Perfect timing!

So I downloaded the pattern, dug through my stash and found some 'Ginger Blossom' by Sandi Henderson fabric, a little cream coloured cotton for lining, red ribbon, and quilt batting.

And voila - two little heart shaped necklace pouches to hold crayons and crafty bits. For Adam, who is too young to sit for any length of time to do 'glueing' I have filled his with snack time cookies.


I think it will be fun to wear one's craft tools or in Mr. A's case, wear ones food which he can do well enough without the aid of a little pouch.

To make the heart shape into a purse, cut 2 pieces of fashion fabric (outside fabric) 2 pieces of lining,  2 pieces of batting too if you want it pouffy and mark a notch though all pieces as pictured below on the template.


If using quilt batting, stitch in place on lining sections with a 1/8" s/a.

On one of the fashion fabric (outside fabric) pieces stitch at the notch section a length of ribbon or cording.

Then pin a fashion fabric piece to a lining piece (right sides together) and stitch from one notch to the other, using a 1/4" s/a.


Do the same with other heart shaped pieces.

Then pull out the bottoms and pin with right sides together the fashion fabric (outside) pieces and the lining pieces. Make sure the ribbon is tucked inside.

Stitch all around pivoting carefully past the notched sections and leave a good size opening in the lining to turn the heart right side out.

Easy-peasy.

For Adams heart pouch I stitched the ribbon to the top of the heart 'bumps' and not at the notch so that the pouch will stay open and he can get his chubby little fingers easily inside.


Off I go babysitting with craft necklace pouches in hand!

Monday, January 14, 2013

Stripes and Polka Dots

For the past two years I have admired all the entries on Project Run & Play.   The themes are challenging and the entries creative and inspiring.

I have found patterns that I wanted to try out from some entries and even bought the same fabric in a few cases.

My favourite theme so far has been the June Bug re-mix and from that my favourite entry was from Cindy.  This pattern is on my very long to-try-out list.

Ashley and Emily, the notorious sewing sisters at FrancesSuzanne,  encouraged me to at least play along with PR&P but looking at my long list of UFO's and the aforementioned to-try-out list, I thought it wouldn't be a good idea....until the other day.
I happened to be in a Fabricland store and saw on sale a big polka dot print for $2.00/m. Wow, $2!!
Knowing this weeks theme at PR&P was stripes and polka dots I weakened, bought the fabric and whipped out a little basic bodice style dress.

For the stripes I spotted this rather loud Seuss fabric, except it wasn't $2.00/m.

So I did it. Stripes and Polka Dots.


As I was constructing the dress, it quickly became apparent that the fabric wasn't worth $2.00. Probably not even worth 50 cents either. It was thin, distorted and I dare say it will survive one wash.  But hey it was fun to whip out.

On the back I sewed on bright red buttons.  I suspect the bow will get changed to something less loud; maybe a plain red sash or a red gingham bow.

(the dress doesn't fit the mannequin that's why it looks distorted.)

When I got to the hem, I didn't bother lining up the dots for the tuck.  As I said, I doubt this fabric will survive one wash.


Size 4.

Saturday, January 12, 2013

Secret Agent Trench Coat

For quite some time I had been waiting for a trench coat pattern from Oliver + S. When it came out a year or so ago, I snapped up the pattern quickly and then promptly sat on it all this time.
Yesterday I  had some sewing time and at long last I made the trench coat!


The fabric used is called Commander.  It's 75% cotton/25%polyester and has a coating to make it water resistant which presents a problem when ironing, stitching and pinning.

The good news is Commander doesn't need to be interfaced. It's stiff enough on it's own.

In terms of ironing, it doesn't hold a crease well even though the iron is set to cotton.  Any hotter and it might scorch. Well, maybe not but I wasn't about to try it.

In terms of stitching, I used a very sharp needle in the machine; a Microtex #12 that I promptly broke due to carelessness and it being my last one, resorted to a Universal #12.

The request was for hot pink buttons as well as hot pink topstitching which worked out just fine when it came to topstitching using the Universal needle.

I didn't select the hand quilt stitch because it would have been too difficult on the Commander fabric.


In terms of pinning, it is near impossible to stick a pin through the fabric.  Cindy suggested using these nifty little clips that indeed were nifty and held the pieces together while I sewed.

Wonder Clips. $20 for pkg of 10

The pattern, like all Oliver + S patterns, was easy. There were many pieces yet the instructions were crystal clear.  Unlike today which is foggy.

It was -20 (-4 oF) at the beginning of the week and now just six days later it's +11 (52 oF) and that is very strange for January.
Plus that, it's raining.
Raining on me, raining on my new trench coat and raining on the wildlife. Therefore, they must be......


.......  here comes the bad pun ........ Rain Deer!

Coat size 4.

I agonized whether button holes should be in pink thread or green, glad I went with green. However they should have been corded buttonholes because these ones frayed.
Next time I make this coat I will set up the back-up sewing machine with topstitching thread to save time changing thread colours.

Thursday, January 10, 2013

Schadenfreude

The other day I received an e-mail from the notorious sewing sisters Ashley and Emily who go by the handle: FrancesSuzanne.
Frances was their mother's middle name but I don't know where the Suzanne came from. And quite ironically, I have a dear family friend who's name is Suzanne Frances.
At any rate, they passed on to me a sort of chain-letter type of link called a Liebster Award.


"The Liebster Blog Award is an award given by bloggers to up and coming bloggers, most of whom have less than 200 followers (or have been blogging for less than 6 months). It is to show newer bloggers that they are appreciated, and to help spread the word about new blogs. It was created to promote appreciation and recognition among the blog world. Liebster translates to “dearest” (or favorite/best) in German. It is also known as the Love Blog Award."


Whenever I see a German word like that, I think of "schadenfreude" which means getting enjoyment from someone else's misfortune.  It's a cool word and there isn't an equivalent in the English language. It's difficult to pronounce too so it's amusing to listen to folks (including me) attempt to use the word. Double-barrel-fun-word, I'd say.

I would also like to point out that I don't take too much in life seriously however I will do my best to join in on the Liebster Award.


Here are the questions that have been asked by Ashley and Emily


11 questions for fellow Leibster award recipients:
1. What are your top five ‘must-read’ blogs?

http://francessuzanne.blogspot.com ...... because of the creativity
http://oliverands.com/blog ...... because it's the source
http://www.smudgetikka.com ....it shows trends
http://dishfunctionaldesigns.blogspot.com ..... it's inspirational
http://malepatternboldness.blogspot.com ....he is hilarious

2. Do you have a phobia? And if so – what is it?

Being old and stuck in a Nursing Home with no other music on my iPod other than Kenny G that someone uploaded thinking I would like it.

3. What is your favorite fabric? This might be a certain designer’s look, or a particular style / texture you are drawn to....

Bombazine .... because it has a funny name.


4. What is your most tried and true pattern in your stash?

Puppet Show shorts and Bubble Dress both Oliver + S patterns.


5. What is your dream job?

I'd like to be Rock Star so I could prance around a stage like Mick Jagger and belt out tunes like Lady Marmalade or Ramble On.

6. Share a tradition that you and your family enjoy


When our children were young, every year it was a tradition to take them on a vacation to a far away land.
Becky with saucer sliding down Mt. Everest
Graham grinning from the summit.
Sarah lookin' cool on an Alpine climb

Becky pointing the way along the Great Wall of China.


What were the odds of finding candy floss on Easter Island?

Now that our children are grown and have left the nest, we've kept up the tradition and we take our labrador Lucy on exotic vacations.

Lucy finding the Northwest Passage.
7. Name one thing sewing-related that you haven’t tried…but want to learn how to do.


Make a bathing suit.

8. What is your favorite month of the year and why?


January, because the cold freezes the sap causing the trees in the forest to make a popping sound, the water under the frozen lake groans and the snow squeaks with every step. It sounds like an orchestra outside.
But next month, ask me again and I'll tell you February is my favourite. Then ask me again in March.......

9. If you had the opportunity to do a guest post, what series would you want to participate in….or, on which site would you like to guest post?


I wouldn't want to do that. 

10. Where do you get your sewing inspiration (be specific – for example: a particular pinterest board, blog, children’s retail, etc.)? 


From all the blogs I follow.  
In my profile is the reading list. 

11. What has been your greatest “sewing find” to date?

Most definitely Oliver + S patterns .....   hands down!


Thank you Emily & Ashley for thinking of me and my little on-line journal. I hope I haven't disappointed you.

Saturday, January 5, 2013

School Days Jacket

This is a test run for this O+S pattern. Waiting in the wings is some lovely pale pink melton with cozy white kasha lining.  In the meantime this remnant fabric of mixed fibers has worked out well for a practice piece.

Bought some cheap stuff at Fabricland agin, huh?


While this pattern is labelled as a '3 scissor' in terms of difficulty with 4 being the most difficult although there is no O+S pattern in that category ... yet ... overall it wasn't difficult at all. Just many steps which isn't surprising for a lined coat with a hood and pockets.

Perhaps the most difficult of all was lining up the plaid while cutting out the pattern pieces to make sure everything aligned.


Because the fabric wasn't very stiff I used some stabilizer in the front placket (wearers left side). In hindsight, I should have used 2 pieces of medium weight stabilizer fused together which would have helped the placket from curling.


I found that the length of cord without the button (wearer right side) needed to be cut 6" long and not 4 3/4" as per instructions. So the next time I make this jacket at Step 5 (Assemble the Front Jacket Panels) stop and make the other side so the toggle cord length can be adjusted before topstitching.

Get on with the diatribe lady. We're after your bird feeder.

For a test run jacket, I think it will look good paired with black wide-wale corduroy pants maybe Sandbox Pants and a white brushed cotton Sketchbook shirt.

Looks more like something Herb Tarlek would wear.


Size 3.

Notes to self:
select heavy fabric setting
change needle to 14
medium weight interfacing
try less stiff cord
piping around hood (fur?)
stop at step 5 and do other side


Sunday, December 16, 2012

Bedtime Story

I am slowly trying out all the Oliver + S patterns. I have them all, plus in all sizes with the exception of one or two but I haven't made every single one just yet.

This one is Bedtime Story p.j.'s.  I lengthened the top to make it into a housecoat.


This nubbly fabric is a pretty yellow cotton that's been in my stash for at least five years and it's perfect for a little housecoat.

I had intended to make some blue jammies to match the tie but I've run out of time and my sewing room has to to switched back to a bedroom for the holidays.


This is size 3.  It took all of 1/2 hour to put it together after it was cut out.  Talk about easy and quick which begs the question ... why I didn't make it sooner.

Thursday, December 13, 2012

Adelaide

I really like the Children's Corner pattern Adelaide.  I've made it several times before with good results.
However my model would only pose if she could make silly faces.


The collar and cuff is black velvet and trimmed with black lace.  It looks a little Goth to me paired with the dark purple and black check in the fabric.

The fabric is a poly blend so it doesn't hold the knife pleats all that well. It's also got a bad case of static cling as can be seen at the armscye.


I found these interesting buttons in my stash.


This is size 4.

Notes to self:
  1. for front pleats don't bother basting, just stitch 2.0
  2. slip a little stabilizer in the buttonhole section of the placket.
  3. make a hem facing
  4. if using larger buttons than 12mm, make an extension on the button section reinforcing with stabilizer
  5. refer to this video for the back inverted placket from Children's Corner.
  6. only use fabric that will hold knife pleats sharply